This week's market environment is exceptionally complex—the unexpected conclusion of the US-Iran agreement and the reopening of the Strait of Hormuz have triggered a massive global asset repricing. Moments of intense market sentiment volatility are precisely when structural analysis proves most valuable. The greater the noise, the more critical the framework.
This week, we focus on two main narratives: How will Bitcoin's subsequent direction be determined following its pullback after breaching $65,000? And, will HYPE's test of the $62.5~$64.57 resistance zone, after completing a four-stage correction, present new short-term opportunities?
For the complete structural analysis, market forecasts, and operational strategies, please refer to the main text.
Summary of This Week's Core Trading Views:
• BTC hourly chart structural analysis. (Details in Part 1)
• BTC weekly market forecast and mid- to short-term operational strategies. (Details in Part 2)
• HYPE hourly chart structural analysis. (Details in Part 3)
• HYPE weekly market forecast and short-term operational strategy. (Details in Part 4)
Last Week's Trading Strategy and Core View Market Validation:
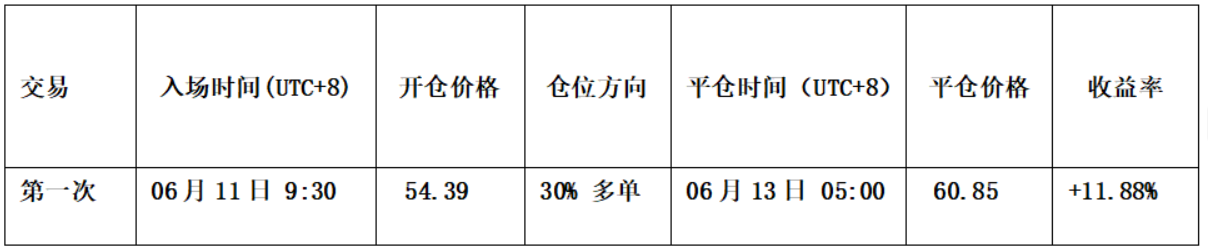
• HYPE Short-Term Trade Performance: Completed one short-term long position trade (1x leverage) last week, achieving a gain of approximately 11.88%. (Details in Table 1)
• BTC Market Forecast Validation: In last week's article, we pointed out: After briefly dipping below the $60,000 threshold, the price found support and would initiate a short-term rebound to confirm the validity of the break below that key level. The current market movement validates our previous forecast.
• HYPE Market Forecast Validation: In last week's article, we pointed out: When HYPE price retested the key support zone of $55-57 showing signs of stabilizing, coupled with bottom signals triggered by our two models, a light long position could be considered. Current market movements are highly consistent with our forecast.
Part 1: In-Depth Analysis of Bitcoin's Hourly Chart Structure
Bitcoin _ 4-Hour K-Line Chart

Figure 1
1. As shown in (Figure 1), since the correction began from the high of $82,850 on May 6th, a detailed 12-stage correction structure can be identified on the 4-hour chart. It includes two descending price consolidation zones: Zone D and Zone E. The overall structure is clear, presenting a typical complex correction pattern.
2. From the 4-hour structural perspective, the market is currently in the 38-39 stage rebound. The price has now surpassed $65,000. If a subsequent effective breakout is confirmed, the next significant resistance for the rebound lies in the $69,500~$70,500 region.
Part 2: Bitcoin Weekly Market Forecast and Operational Strategy
1. BTC Weekly Market Movement Forecast:
This week's core view: Focus on the result of the pullback confirmation after the price broke above $65,000.
• If the pullback fails and the level is lost, the market may test the $60,000~$62,000 core support zone again.
• If it holds firmly above, it will challenge the $69,500~$70,500 core resistance zone. This area will be a key region for us to plan mid-term short position entries.
2. Core Resistance Levels:
• First Resistance Zone: $69,500~$70,500 region (previous high-volume trading zone)
• Second Resistance Zone: $72,500~$74,500 region (previous high-volume trading zone)
3. Core Support Levels:
• First Support Level: Around $65,000
• Second Support Level: $59,000~$60,000 region (previous important support)
• Third Support Level: Around $55,000 (previous important support)
4. This Week's Operational Strategy (Excluding Impact of Unexpected News)
1. Mid-Term Strategy:
Bitcoin _ Daily K-Line Chart: (Position Monitoring Model)
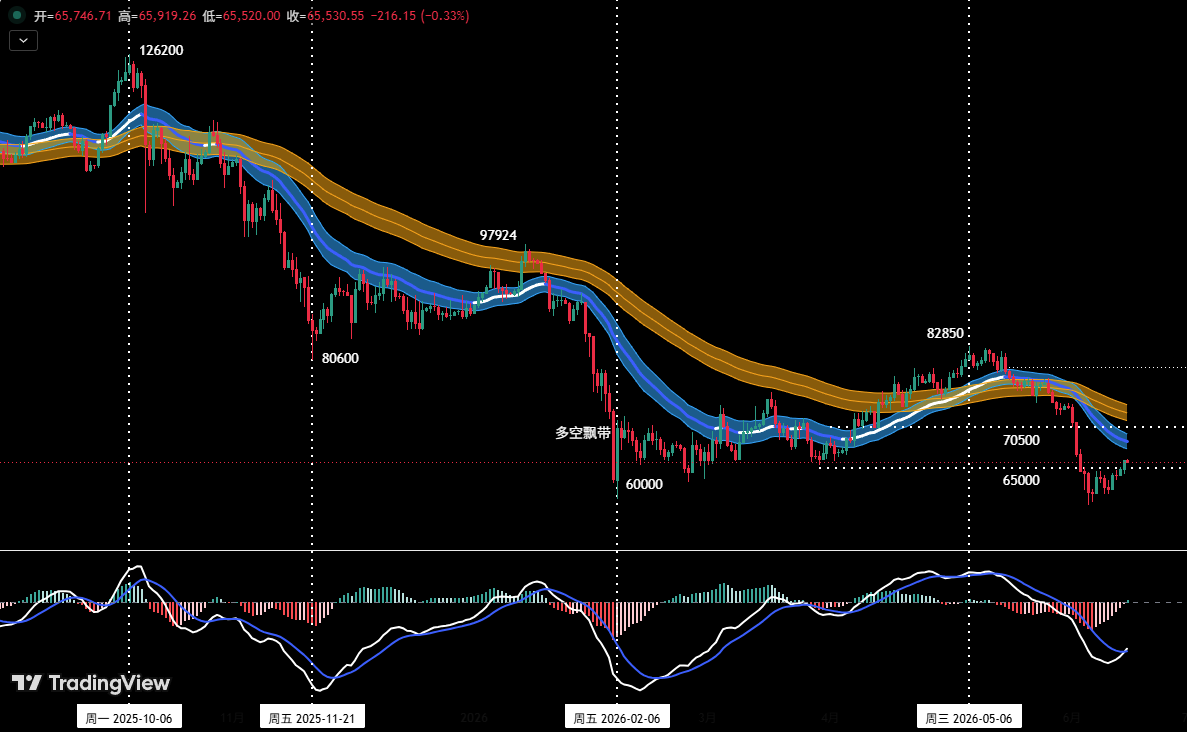
Figure 2
Position Monitoring Model: As shown in (Figure 2), the current price has effectively broken below the "Bull-Bear Channel," with the technical pattern shifting to a bear-dominated structure. Last week's market did not meet our pre-set conditions for initiating a (short) position, so the mid-term position remains empty for now.
This week, based on the outcome of the battle for $65,000 between bulls and bears, mid-term short positions can be gradually built according to the following three-tiered strategy:
• Add Position at Strong Resistance: If the price successfully holds above the $65,000 region and subsequently rebounds to the $69,500~$70,500 zone showing clear resistance signs, consider establishing a mid-term (short) position, with total exposure controlled below 60%.
• Short on Support Break (Follow-through): If the price loses the $65,000 support and shows signals of a confirmed breakdown, you can initially establish a 30% mid-term short position.
• Short on Further Break (Momentum): If the price loses the $65,000 support and effectively breaks below the $59,000~$60,000 support zone, you can add to the short position, with total exposure controlled below 60%.
2. Short-Term Strategy: Utilize 30% of capital, set stop-loss points, and seek "spread" opportunities based on support and resistance levels. (Use 30-minute/60-minute as the operational timeframe).
3. For short-term operations, to dynamically adapt to complex market developments, we have prepared A/B two specific operational plans in advance.
• Plan A: Enter Position at Strong Resistance.
• Entry: If the price successfully holds above the $65,000 region and subsequently rebounds to around $69,500~$70,500 showing signs of stalling, combined with top signals from the quantitative model, you can initiate a short position below 30%.
• Risk Control: Set initial stop-loss.
• Exit: Gradually close the position to take profits when the price adjusts near important support levels, combined with model signals.
• Plan B: Short on Effective Support Break (Follow-through).
• Entry: If the price loses the $65,000 support and shows signals of a confirmed breakdown, you can initiate a short position below 30%.
• Risk Control: Set initial stop-loss.
• Exit: Gradually close the position to take profits when the price falls to important support levels, combined with model signals.
Part 3: HYPE Hourly Chart Structural Analysis
HYPE_4-Hour K-Line Chart
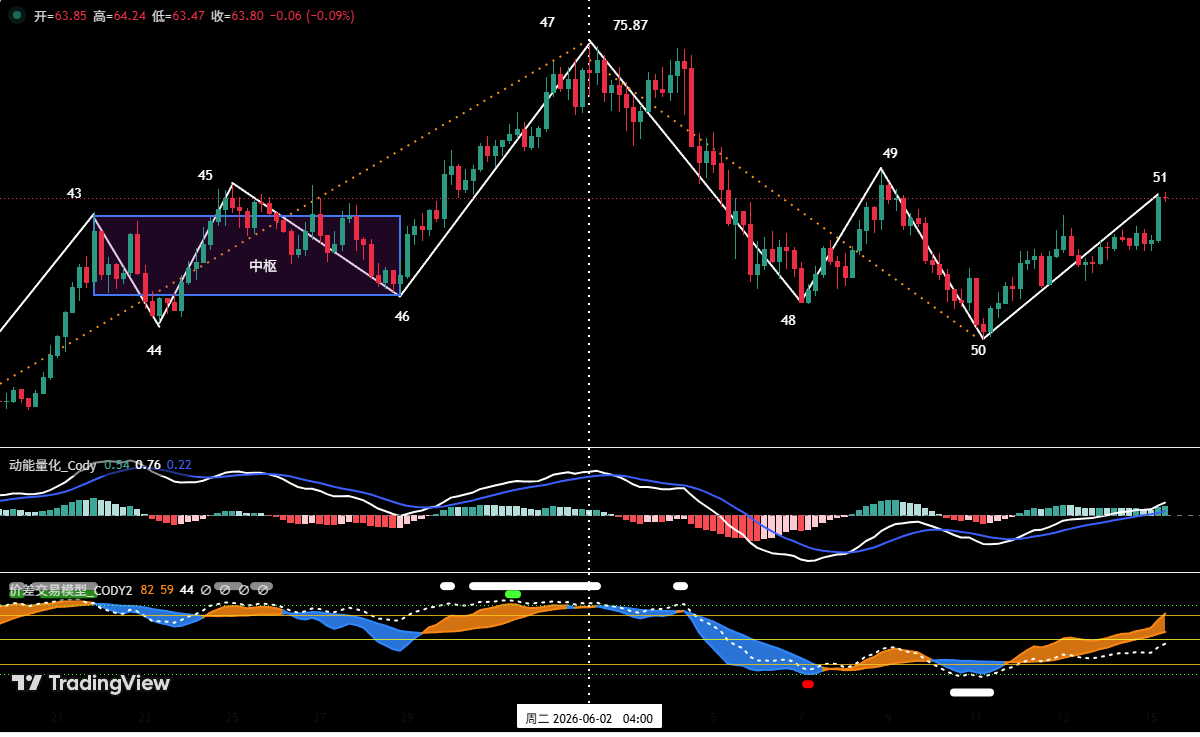
Figure 3
1. As shown in (Figure 3), on the 4-hour timeframe, HYPE's correction since the June 2nd high of $75.87 can be subdivided into a four-stage structure: (47-48), (48-49), (49-50), (50-51).
2. Currently, HYPE price has stabilized and rebounded from the support area around $52 and is in the (50-51 segment) rebound process. The overhead resistance lies in the $62.5 to $64.57 region. If (endpoint 51) forms a high point in this area (there is a high probability the overall trend will construct a "descending consolidation zone" here), the price will likely continue downward to seek stronger support.
Part 4: HYPE Weekly Market Forecast and Short-Term Operational Strategy
1. HYPE Weekly Market Movement Forecast:
1. Core Resistance Levels:
• First Resistance Level: $62.5-64.57 region;
• Second Resistance Level: $68-70 region;
2. Core Support Levels:
• First Support Level: $52-55.5 region;
• Second Support Level: $47-49 region;
This Week's Core View on HYPE:
• Observe the resistance effect in the $62.5-64.57 region and the position where "endpoint 51" forms its price high.
2. HYPE Short-Term Operational Strategy This Week: (Buy on Support)
This week's HYPE short-term trading should adhere to the strategy of "buying on dips, avoiding chasing rallies."
Short-Term Strategy: Test Long on Support Zone Stabilization
When HYPE price retests the key support zones of $52-54.5 or the deeper $47-49 and shows signs of stabilizing, combined with bottom signals triggered by our two models, consider testing a light long position. Position size must be controlled below 30%, and strict stop-loss discipline must be maintained.
Part 5: HYPE Operation Review
1. Short-Term Operation Review: (See Table 1)
We strictly followed the operational plan and, based on trading signals from our self-built "Spread Trading Model" and "Momentum Quantitative Model," completed one short-term (long) operation last week, achieving a trading profit of 11.88%.
2. HYPE Short-Term Trade Details Summary: (Leverage*1x)
3. Short-Term Trade Review: (See Figure 4)
1. Entry Strategy:
• A relatively complete downward correction structure had been completed beforehand;
• Our self-built "Spread Trading Model" had already issued strong bottom warning signals in advance (red and white points in the chart);
• Our self-built "Momentum Quantitative Model" had issued a momentum bottom divergence signal;
Based on the above three points, we entered a 30% long position around $54.39.
2. Exit Strategy:
• When the price rose to around $62.5, it showed signs of encountering resistance;
• Our self-built "Spread Trading Model" had already issued a top warning signal in advance (white point in the chart);
• Our self-built "Momentum Quantitative Model" had issued a momentum top divergence signal;
Therefore, we closed the entire position around $60.85.
3. Summary: This trade successfully achieved a profit of approximately 11.88%.
HYPE_30-Minute K-Line Chart: (Momentum Quantitative Model + Spread Trading Model)
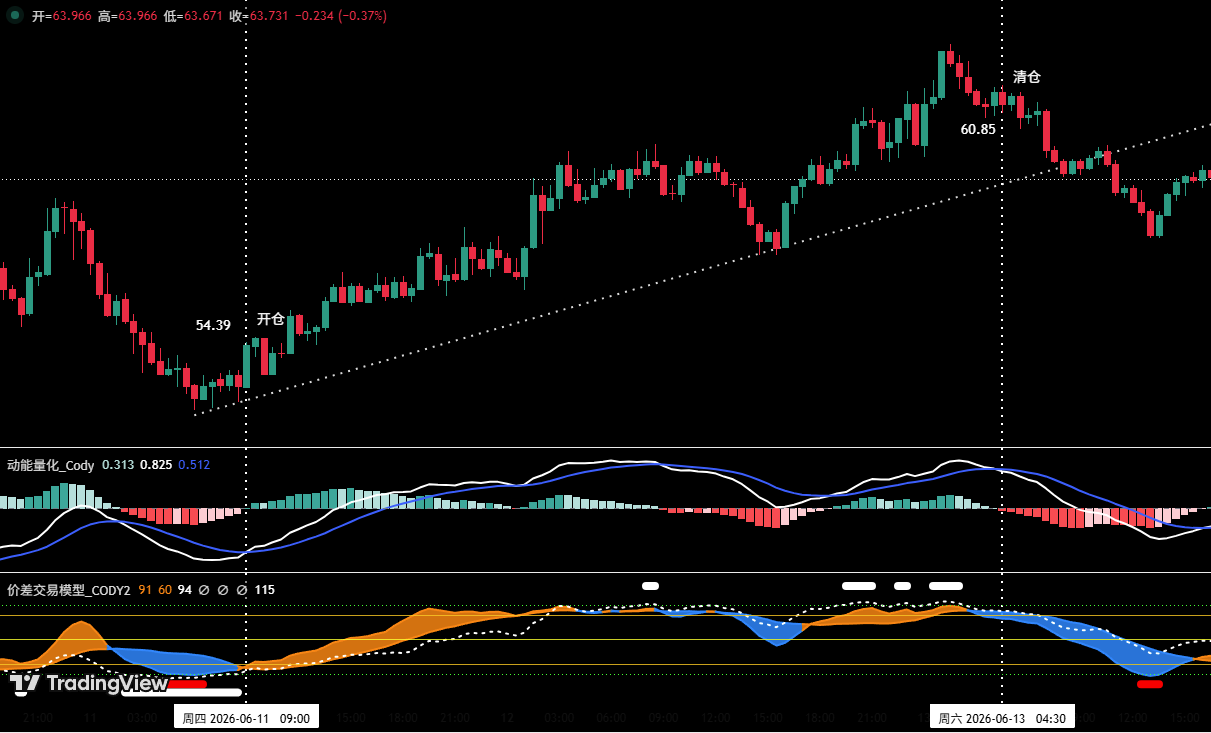
Figure 4 (Short-Term Trade Illustration)
Part 6: Special Notes:
1. Upon Entry: Immediately set an initial stop-loss.
2. When Profit Reaches 1%: Move the stop-loss to the entry price (break-even point) to ensure capital safety.
3. When Profit Reaches 2%: Move the stop-loss to the 1% profit level.
4. Continuous Tracking: Thereafter, for every additional 1% profit, move the stop-loss up by 1% accordingly, dynamically protecting and locking in gains.
Financial markets change rapidly. All market analysis and trading strategies require dynamic adjustment. All views, analytical models, and operational strategies mentioned in this article are derived from personal technical analysis, intended solely for personal trading log purposes. They do not constitute any investment advice or operational basis. Markets involve risks, investment requires caution. Please do not make decisions based on this content.